VOD Review: Taking an in Depth Look at Arklov Peak SND
An In-Depth Look into Arklov Peak as an SND Map
This article is part 1 of 5: each article is going to take an in depth look at every Search and Destroy map in Call of Duty Modern Warfare. In part one we will be looking at Arklov Peak. The entire goal of this series is to really go in depth with what the numbers are telling us about certain Search and Destroy maps.
From an analytical perspective, we need to break down offensive/defensive strategy on a round by round basis. Once we find the baseline offensive win percentage for every map individually. We can then begin to take a deep dive into specific strategies that are succeeding above that percentage threshold.
For example, if on random map #1 the offensive win-rate is 40%, it is not a failure to succeed on a specific offensive setup on that map only 41% of the time. That would be plus EV and a success, although a small success. In my opinion, too many teams are playing to be perfect, thus leading to mistakes and suboptimal strategies in game. That should not be the goal. The goal should be to find out what strategies are working most efficiently, and design an overall game plan around maximizing the use of that strategy without becoming too predictable.
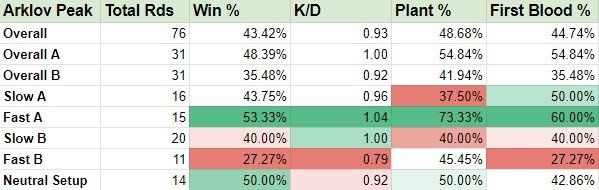
Arklov Peak has the second lowest offensive win % at 43.42%. Although it can be tough to succeed on offense, it is one of my favorite SND maps to watch. There are lots of creative routes teams can take, and essentially five lanes to watch at all times. Looking into specific setups, we see that A focused offensive rounds are succeeding about 13% more often than B focused rounds. Neutral setups tend to be a bit more polarizing. Although they win at a 50% rate, they have a K/D of .92.
Looking at the data; every setup besides Fast B pushes should be utilized in an overall game plan. Although slow B pushes are slightly sub-optimal at 40%; they should be mixed in at a low frequency for balance purposes. Lets take a look at some specific strategies that really stand out to me.
Fast A:
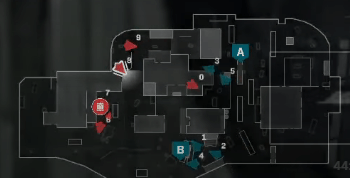
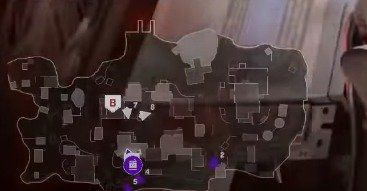
This is a strategy that we see New York use frequently with high success. Because of the positions that Mack (#1), Temp (#2), and Attach (#3) are set up in early. ZooMaa is able to get aggressive through trench (#5). The goal is to get first blood, but even if he doesn't it will be very hard for one of those three to not at least trade the kill with the setup they are in.
In this situation he does get the first blood which forces Havok (#0) and Skyz (#7) to immediately turn around, leading to the rest of New York pushing up and killing both with their back turned, taking site control and eventually closing out the round with only one death.
Although we know aggressive A setups work well on this map, this particular setup from New York really stands out to me. It's a very controlled yet aggressive push. Having an entry player as good as ZooMaa certainly helps.
Neutral Setup:
We see neutral setups on Arklov with the second highest offensive win rate at 50%. Toronto and Florida really stand out to me as two teams who really utilize neutral setups on Arklov at a high frequency, with lots of success.

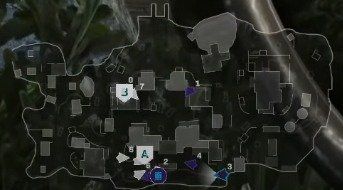
In this example, Toronto utilizes a neutral setup to perfection vs Atlanta. They initially setup in a way so that all five lanes on the map are accounted for. I specifically like this vs an Atlanta team that likes to get very aggressive at times.
Although the setup is good, the execution is even better. Watch what happens immediately after Methodz (#3) finds first blood.
After Methodz gets first blood, Mettalz (#2) spots Cellium back rock (#7). Without hesitation, they immediately rotate to A. They already have a 5v4 advantage due to first blood, but knowing that Cellium is back rock, by going directly to A they now for sure have a minimum a 5v3 situation on the A side of the map.
After the rotation, Toronto now has Mettalz watch the full flank all the way in the back while the rest of his teammates fight for hill control. They win the gunfights needed and now Atlanta has their last two members away from the A site having to rotate. They use the same strategy in round 10 to close out the map; winning with 5 kills and 2 deaths for a total of 10-4 using the strategy.
Minnesota Gaming Creative
When you think of Search and Destroy, what makes it so great as a game mode is the mindgames and the levels of strategy based on those mindgames that go into it. This series of three straight offensive rounds from Minnesota on Arklov does a great job of highlighting that. Minnesota does a great job of getting creative on a map where it can be tough for offensive teams to succeed.
In round one Minnesota fakes an aggressive B push with three players pushing up quickly to the site using smokes, grenades and flashes. While this is happening watch the bottom right corner on the minimap. The bomb carrier and #3 (GodRx) are there to take site control as the rest of Seattle rotates to help at B. Even though they are down 5-3, having A site control with GodRx looking down the sniper scope is almost impossible to overcome and Minnesota wins round one.
In round two they use a very common A setup, Godrx sniping down trench while two players push up with a mid-map smoke and get the bomb down at A. While there is nothing special in this offensive setup, the beauty of this round is what they do on their very next offense.
This time Minnesota uses the same exact smoke grenade front broken they used in the previous round, but instead of going A send three players through the smoke to B where they now have a numbers advantage at the B site and eventually win the round.
Slow B Setup:
When it comes to B setups on Arklov, although it is a tough bombsite to succeed at, certain teams have done a great job of it. Atlanta is one team that does a good job of really slowing down on their B setups to find information, play for picks and then determine from there what to do next. We know that a fast B strategy on Arklov is very sub-optimal, so if you are playing the B bombsite this is the way to go about it.
In both of these clips, Atlanta methodically attacks the B site. They use this strategy to win two massive offensive rounds vs New York (round 8 down 3-4) round 10 (up 5-4). They combine for 10 kills and only 3 deaths. In both rounds, they keep the bomb carrier in the back watching the flank so if needed they can rotate. While this is happening they have Priestahh (#9) getting aggressive looking for first blood while the rest of the team is playing over him mid-map getting information and looking for picks themselves.
More Theory/Analysis