Complete Analytical Breakdown of Gun Runner SND
An Analysis of SND Play on Gun Runner
This is going to be a five part series breaking down every Search and Destroy map and the ways in which teams can be more effective on offense heading into Cod Champs. It will also be analyzing the VOD of some of the most effective offensive strategies/setups.
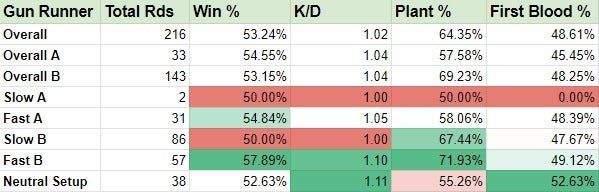
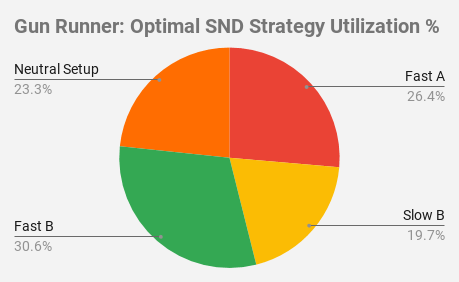
Gun Runner is one of the few maps where it is extremely balanced across the board in terms of which strategies are successful. It is also #2 in overall offensive win % behind Piccadilly (53.66%). When looking at total rounds it is clear that slow B setups are the most preferred strategy of all teams, but the numbers actually favor it the least (behind slow A which has only happened twice out of 216 rounds so am discarding).
One thing that really stands out to me is that Neutral setups on the map do so well in terms of K/D at 1.11, but actually perform worse than the average winrate of 53.24%. This is likely due to teams being more spread out on a map where trades are so crucial. The rounds they do win with neutral setups tend to not be close.
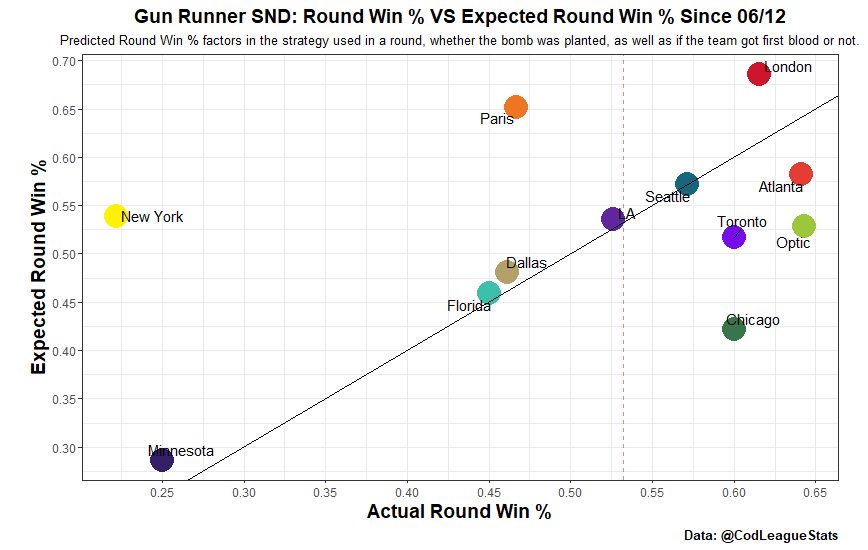
Looking at specific team success on Gun Runner, London does an incredible job of utilizing effective strategies most often and they are able to translate that into the 3rd highest win %. Meanwhile, the Huntsmen are by far playing the least optimal on Gun Runner, yet still winning their offensive rounds at a 60% frequency. Surprisingly, Optic leads in offensive round win % despite playing a fairly sub-optimal strategy.
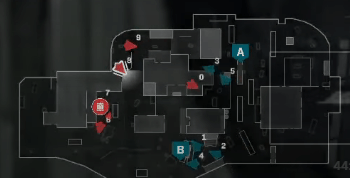
Fast B:
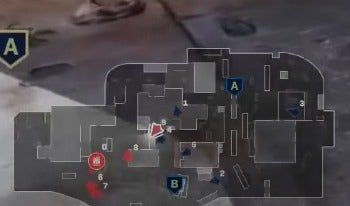
There are numerous ways you can choose to attack the B site quickly. This round specifically from Atlanta Faze really stands out to me as a great way to approach it. #8 (Simp) and #0 (aBezy) both hard hit B and play eachothers trades. Majormaniak (#6) and Cellium (#7) are able to play forest with AR's and look over both of them. Meanwhile, Priestahh (#9) is playing for information and watching the flank at B Dom and mid-cut. This is a great position to be in to catch or hear any players rotating back to the B bombsite once Dallas gets word that it is a fast B push. Eventually Priestahh is able to push through trains to set up a pinch and give Faze the round victory.
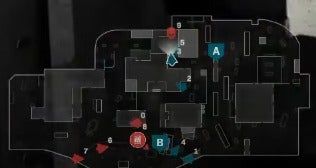
In this example, Optic utilizes the same concept of sending two players straight at B but this time give up Forest for more midmap control. By doing this they allow Kuavo (#1) to push through green and help out Drazah (#5) and Hollow (#4) with any trades. What may go unnoticed is also #3 (Slasher) getting the angle from P3 onto crates where he is able to get information to help open up the B site. In this specific instance he is able to get the first blood as well which is massive. After which he is now able to check for any full flank pushes through B dom and then push up and take boiler control.
Fast A:
Just like Fast B pushes, there are only so many unique ways you can really attack the A site quickly. The most popular setup by far is to 4 hit through B dom and have a 2/2 split with 2 going through lockers and 2 going through midcut. There is almost always one player near the spawn or A Dom watching any type of flank as well. You can vary this setup slightly by sending one player through boiler into office or only sending one through lockers. One of my favorite Gun Runner SND maps on the year came from the Dallas-Florida semi-finals ( https://www.youtube.com/watch?v=KZVv0Dm9xnY&t=3258s). In the game 2 SND Dallas fearlessly goes fast A three straight offensive rounds (2-4-6) and wins all three.
Neutral Setup:
Neutral setups and midmap stacks are becoming more and more popular on Gunrunner and for good reason. Getting midmap control has always been a staple in SND. On Gun Runner specifically, the rotation to either A or B is just a few seconds from boiler. This allows you to play for trades and information while still keeping both bombsite options open.
Paris has been a team that has utilized this setup frequently with their newfound SND success. In their recent upset SND win over Dallas they used this same exact setup in rounds 1 and 3. My favorite part of this is how great their rotation to B is. After a few back and forth trades Paris holds a 4-3 numbers advantage before shifting towards B. Notice they don't immediately go for any individual plays on the site though until #1 (Louqa) spots a Dallas player still at the A site. Paris now immediately knows they have a minimum 3-2 numbers advantage at the B site once the bomb carrier gets there. #3 (Shockz) holds front bathroom while #2 (Kismet) holds the rotation through crates to B and they are able to get the bomb planted.
Besides stacking boiler, here are a couple more neutral setups that really work well on Gun Runner:

These types of setups work extremely well versus teams who have a tendency of being too aggressive on defense. Holding angles/cut points allows you to get easy picks and then decide how to proceed from there. In both of the above examples the offense wins the round with only one death.
Slow B:
Although Slow B setups tend to be overused by teams on Gun Runner, there are quite a few teams who do a good job of utilizing it effectively. Being successful with a slow B setup usually means getting into aggressive positions early on and then holding those angles. LA does a fantastic job of that here.
Utilizing a smoke, Vivid (#9) is able to get onto top bathroom. From there LA is setup so that they can just hold all of these spots until Chicago makes a mistake. There is really zero players that can die without getting traded out besides (#7) Aqua who is watching full flanks at P3 from the heady. When you're utilizing any type of slow/controlled setup, this is exactly how you want to do it.
Creative Setup:
When playing a team that likes to be very site heavy on defense, I really like this approach from Optic here. They split 3/2 A/B with the bomb carrier being on the A and 2 side. The goal for Optic here is if Seattle goes heavy onto B to just fast hit B with 3 players and have them trade/create enough madness to allow the bomb to get planted easily at A. In this specific case Seattle actually sends 4 players towards A. Even though they take the early 4-3 advantage they have no idea that Optic has 3 players hitting the B side fast. This gives Optic a 3-2 numbers advantage back crates. They win both of those gunfights and now just have to worry about the last two players they know will be rotating from A.
Setting Up for Future Rounds:
One of my favorite approaches when playing offense on SND is intentionally setting up future rounds. In this first example Simp (#8) is able to get the sniper pick from P3, meanwhile aBezy (#0) flys straight through boiler into office and gets two kills. They end up winning this round easily.
On the very next offense, Seattle now knows that they have to worry about aBezy going into office, as well as the Sniper angle from P3. Knowing this, Atlanta completely ignores boiler as Seattle sends two resources there. Seattle also doesn't try to get any B control due to the concern of Simps sniper from the previous round. Simp and aBezy instead fast hit B with their numbers advantage and win the round easily.
Defense Special:
Because Defense is actually more difficult to win on Gun Runner I wanted to include a few setups I especially enjoy on Gun Runner. What makes Defense so difficult on Gun Runner is the fact that if the bomb is planted at A the site is just so hard to retake. But if you commit resources to stopping the bomb plant at A then you are extremely vulnerable at the B site where teams tend to favor a majority of their offensive pushes. Teams doing their research to figure out their opponents tendencies and hard-countering them are going to have the most success on Gun Runner defense.
In my opinion the most critical aspect of defense on Gun Runner is fighting for mid-map/boiler control and being aggressive. Teams that play passive on Defense on this map often struggle as it is just so hard to regain control on the map once you lose it. You need to be aggressively setting up mid-map so that you can counter any type of B setup. Here Dallas does a great job of that. (#1) is holding boiler and (#5) is holding bathroom. Both of these positions allow (#4) to freely be aggressive as he pushes up to halfwall. If Atlanta is to fast hit A, both #1 and #4 can pinch due to boiler control with (#3) slowing it down from top AC.
For more analytical/theoretical content: Follow me on twitter @KarsenCLS
More Theory/Analysis